

Boston Sunset Fury from 14th Floor Seaport Balcony
#20 Catching the light and Color of Sunset Behind the Boston Skyline from my Balcony


Boston Sunset Fury - One in a Ten Thousand
This cityscape appeared just after I posted my last article. It’s one of those rare moments that stays in your head. I’m grateful I caught it and even happier to share it.
It’s literally one of only nine “five-star” (★★★★★) images from more than 23 000 frames I’ve taken so far in 2025 — a reminder of how few “A-shots” appear each year.
I was hanging with my wife Lynn, and from our window in Boston’s Seaport she yelled, “look at that sunset!” I took one glance and knew I had a few moments to capture the bits and claim the prize.
The Capture
The orange-red light was so intense it bounced off downtown glass onto the fronts of other buildings. The new South Station tower, still under construction, glowed with red roofline lights on three tiers. Those lights cycle nightly through colors — blue, pink, green — but that evening the red matched the sky. The construction floors below still burned bright with work-lights.
I dashed to the balcony corner, stabilized the tripod with counterweights against the wind, and got to work. I fired fast. Sunsets like this fade in minutes — maybe ten, maybe five.
A minute after the first image above was taken, I caught this next shot below. Do you notice the subtle differences?

Same Focal length (44mm) on my RF24-70mm F2.8 Lens, but you can see the darkening skies and cloud trails taking on a different mood in this shot.
Wanting to stretch the view, I widened to 24 mm for a brighter version that pulled in more of the Seaport Boulevard Bridge and South Boston skyline.

Only 1.5 minutes separated the two shots. It even looks “brighter” — maybe the bridge lights fool the eye. What do you think?
I Couldn’t Stop There - More from the Tripod

I love experimentation with anything, but especially my Photography. I left the tripod out, grabbed dinner, and came back around 9 : 30 p.m. to chase long-exposure light trails.
I changed lenses and put in my 24-240mm F5.6 lens. Much slower, but long exposure doesn’t always need a lot of light. The image above I chose to narrow down the bridge as my target. I zoomed into 109 MM and shot this for 21 seconds at f22 to avoid overexposing the bridge lights. Still keeping my ISO at 100 to minimize noise.
A few minutes later I wanted bi-directional motion, so I reframed at 42 mm — same 21 s, f/22, ISO 100 — to catch both head- and taillights curving through the frame.
I shot this pair and placed into a Diptych.

Traffic was spotty and erratic, but I was able capture the turning lights of the front and rear lights. What do you think?
And to follow up my ghosts essay on long exposures of crowds from a few posts ago, I caught the outdoor rooftop restaurant crowd in long exposure as well.
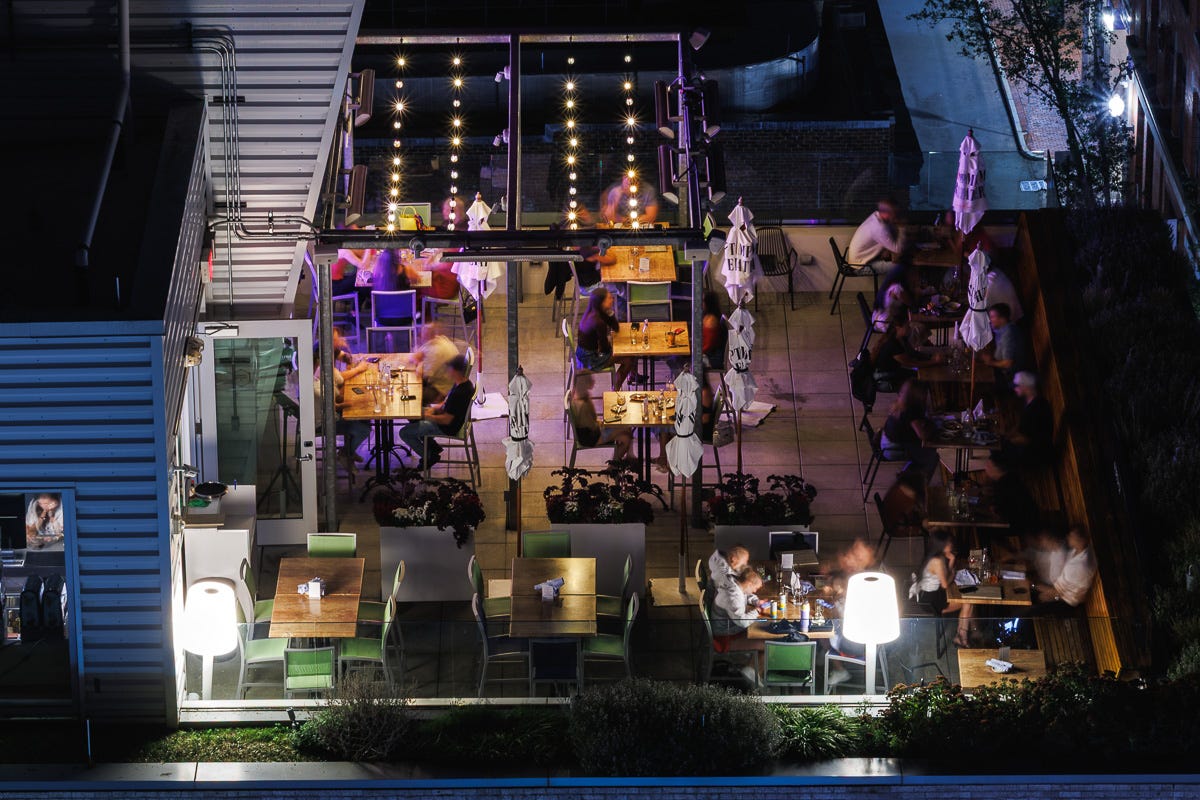
This was shot at 150MM for 61 seconds at F22 and ISO 100. I really like to push the ghostliness of people as some moved throughout the floor during the 60 second exposure. I was able to avoid the highlights of the lamps while retaining the saturated colors on the floor.
Here is my previous post about the Ghosts of Grand Central Station:

And Wait, That’s Not All for the Tripod
Sometimes I tend to fixate on some things. I kept the tripod out. The next day, I caught sunrise reflections bouncing from Boston skyline into the channel.

At 9am, the Sun-sparked reflections twisted like snakes across the water. Shot at 40mm, F8 at 100 ISO and 2 stops underexposed to protect highlights in the sky and reflections. (I really get concerned about blowing out highlight, which you cannot recover). (I have the histogram showing in my viewfinder to always double check exposure).
Further Experimentation - Post Processing
The theme of experimentation continued indoors. I’d just watched a YouTuber praise the “Dark Tone” aesthetic — cinematic, moody, Batman-era lighting.
I decided to test it. Normally I favor bright, crisp, high-contrast images, but trying something moodier felt right. Maybe it’s time to evolve.
Here is the video that inspired me:
Below: my first comparison using that creator’s method versus my own. Can you tell which is which?

Is it more apparent in a tighter shot?

And, If rooftop photography is your thing, check out my previou posts:

Lessons learned 🧠
As always, a few reflections from the shoot and edit process:
Lifelong learning matters. Each new approach — from gear setup to editing — teaches flexibility.
Dark and moody has a place. I’m still mapping when and why to use it. Maybe more printing tests will decide.
Tripod discipline pays off. Leaving it up revealed fresh light the next morning.
Protect the highlights. Two-stop underexposure saved this shot; the histogram never lies.
Curiosity keeps you shooting. The only way to grow is to keep asking what if … ?
Your Turn 🫵- Can you Answer this for Me? 🤔
I’m curious — does experimentation play a role in your workflow?
What’s your “A-shot” hit rate?
Do cityscapes hold your interest, and why?
How do you feel about dark, moody processing?
If you made it this far — thank you 🙏 — and tell me what you’re shooting, seeing, or planning this season.
That’s All…. for now
IThat’s all for now — but I’ll be back soon.
I’ve been shooting heavily but posting less while getting my steps in again. Expect a steadier rhythm of new work and stories ahead..
So tell me—WHAT’S UP with You? 👀
Copyright Stuff
All photographs and images are copyrighted and created by me, David Rosen, unless otherwise noted. If you are interested in prints or using these images, simply reach out and ask at click@imagefrontiers.com.
Fantastic!!!
Does experimentation play a role in your workflow?
Absolutely. I am experimenting as much as possible. Both in the shooting and the processing. I have been pushing the edges my whole career. Need to do more.
What’s your “A-shot” hit rate?
OK... I do not want to sound arrogant, but it is very high. Probably because I don't shoot as much without deliberate intention, and maybe because I have been doing it for nearly 60 years. I am as comfortable looking through a viewfinder as I am watching a movie. When I am experimenting, I am never afraid to fail though, so I push farther than acceptable to form the boundaries.
Do cityscapes hold your interest, and why?
I am ot much of a city guy, nor street photography. I don't hate it, though, I just don't do it or see much of it.
How do you feel about dark, moody processing?
Love it. I have a couple of dark presets I made and use on appropriate images.
I really liked this article, David. Well done.